WA6. OOP in Swift
Task 1
- Compare and contrast structs and classes in swift with the help of examples
- Structures are value types, classes are reference types.
- Both can Have: properties, methods, initializers, subscripts, and extensions.
- Classes can:
- Inherit other classes, structures cannot.
- Override methods, structures can NOT.
- Final classes cannot be subclassed.
- Deinitializers, structures cannot.
- Classes do not need
mutatingkeyword to change properties, as they are reference types and are mutable by default.
-
Structs have:
- A default initializer, classes do not.
- Any change to a property in a method must be marked with the
mutatingkeyword, as the struct itself is a constant.
-
The following code compares passing by value and passing by reference:
struct Resolution {
    var width = 0
    var height = 0
    init(width: Int, height: Int) {
        self.width = width
        self.height = height
    }
}
class VideoMode {
    var resolution = Resolution(1,1)
    var interlaced = false
    var frameRate = 0.0
    var name: String?
}

var res1 = Resolution(1,1)
var res2 = res1
res2.width = 2 // res1 is not affected
print(res1.width) // 1, as res1 is a value type

var videoMode1 = VideoMode()
var videoMode2 = videoMode1
videoMode2.resolution.width = 2 // videoMode1 is affected
print(videoMode1.resolution.width) // 2, as videoMode1 is a reference type
Task 2
Statement 2
- You are working as a research associate in ABC Computers PVT LTD.
- As a part of one of your ongoing research projects, your senior has asked you to perform a set of tests (let’s call it TestSet 1) on odd days (Day 1, Day 3, Day 5, Day 7, Day 9, and so on).
- And you are supposed to perform another set of tests (let’s call it TestSet 2) on even days (Day 2, Day 4, Day 6, Day 8, Day 10, and so on).
- Your senior has told you to track and maintain a record for this and that he wants to know the status of the tests done as per TestSet 2 in the next three months.
- To keep a track of this, you decide to develop an iOS app by creating a to-do list with a function to filter to-dos based on completion status and days (even).
- Hints:
- Create a struct that you may name as ToDo having properties toDoId, toDoTitle, and toDoStatus.
- Then create an array of objects of this struct with some sample data (a few examples are given below as reference).
- Create a function that will accept the array of type ToDo struct, as a parameter and have the same return type as that of the parameter. Based on the toDoId and toDoStatus, filter the parameter array and create a new array containing only those objects having toDoId as an even number and status as completed. Then return the same array from the function.
Solution 2
- Well the requirements are vague, but I’m going to follow my own interpretation of the requirements.
- Code in this App is inspired by (Swiftful Thinking, 2021)
- The application lands on a screen that includes both TestSet 1 and TestSet 2 or even and odd days and called
All ToDos.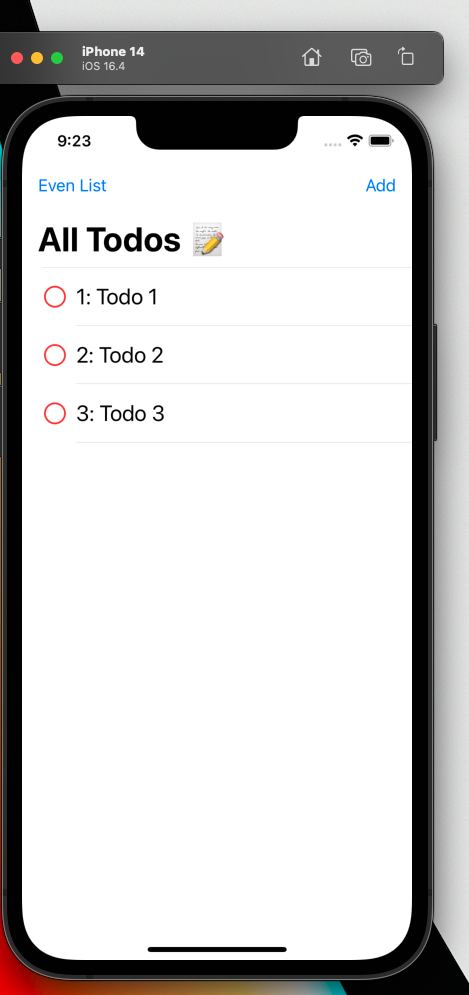
- You can click
Addto add a new ToDo, theidis automatically generated and incremented from the lastidin the list by 1; thus, if the last Todo is even, the new Todo will be odd and vice versa.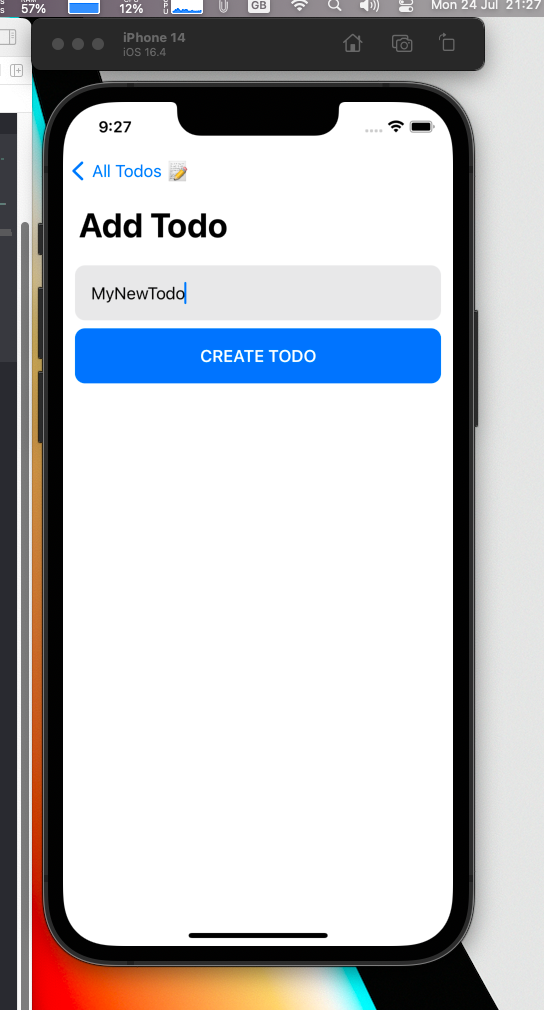
- If you go back to the
All ToDosscreen, you will see the new Todo added to the list, inPendingstatus by default.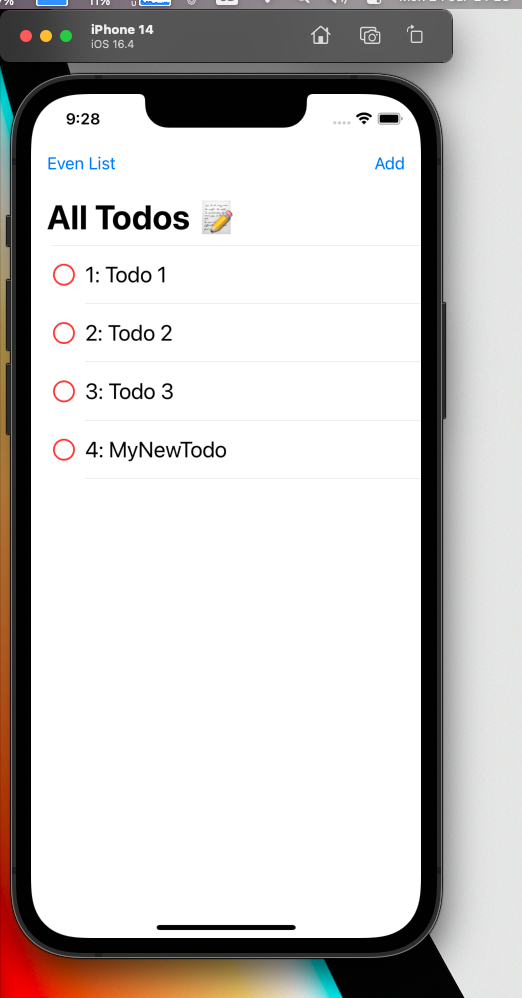
- Clicking on the Todo, will toggle its status between
Pending(red) andCompleted(green).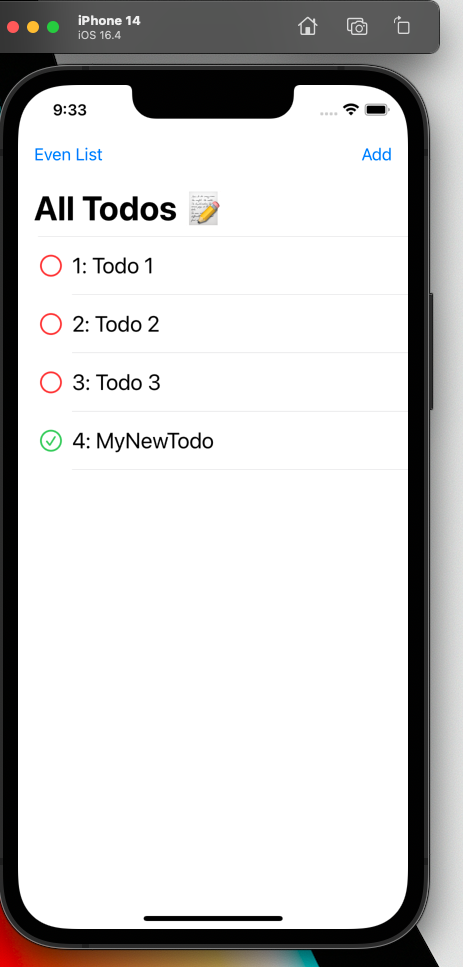
-
At the top, you can see a button for
Even List, you can click to see the list of even and completed Todos.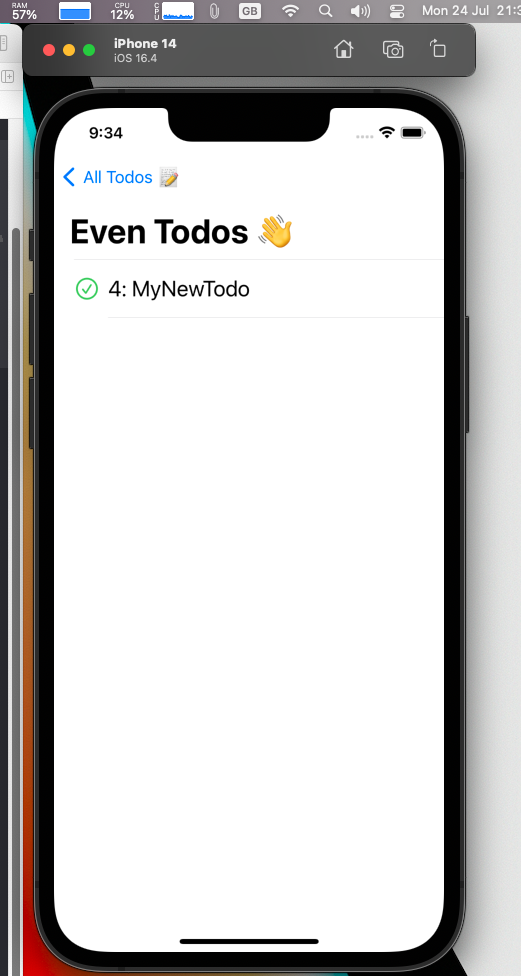
-
Here is the code for the
ToDostruct:
// Models/TodoModel.swift
import Foundation

enum TodoStatus  {
    case pending
    case completed
}

struct TodoModel: Identifiable {
    static var lastId: Int = 0;
    let id: Int
    let title: String
    let status: TodoStatus
    var isCompleted: Bool {
        return status == TodoStatus.completed
    }

    init(title: String, status:TodoStatus, _id: Int?) {
        if let id = _id {
            self.id = id
        } else {
            TodoModel.lastId+=1
            self.id = TodoModel.lastId
        }
        self.title = title
        self.status = status
    }
}
- And here is the code for the
TodoListViewModel:
import Foundation


class TodoListViewModel: ObservableObject {
    @Published var todos: [TodoModel] = []

    var evenTodos:  [TodoModel] {
        return filterCompletedEvens()

   }

    init(){
        let newItems = [
            TodoModel(
                title: "Todo 1",
                 status: TodoStatus.pending,
                  _id: nil
            ),
            TodoModel(
                title: "Todo 2",
                 status: TodoStatus.pending,
                  _id: nil
            ),
            TodoModel(
                title: "Todo 3",
                status: TodoStatus.pending,
                 _id: nil
            )
        ]
        todos.append(contentsOf: newItems)
    }

    func deleteTodo (indexSet: IndexSet){
        todos.remove(atOffsets: indexSet)
    }
    func reorderTodos (from: IndexSet, to: Int){
        todos.move(fromOffsets: from, toOffset: to)
    }

    func addTodo(title: String){
        let newTodo = TodoModel(
            title:title,
            status: TodoStatus.pending,
             _id: nil
        )
        todos.append(newTodo)
    }


    func updateTodo (todo: TodoModel) {
        if let index = todos.firstIndex(
            where: { t in t.id == todo.id }
            ) {
            let nextStatus = todo.isCompleted
                ? TodoStatus.pending
                : TodoStatus.completed

            todos[index] = TodoModel(
                title: todo.title,
                status: nextStatus,
                _id: todo.id
            )
        }
    }


    func filterCompletedEvens () -> [TodoModel] {
        var evens: [TodoModel]  = []
        todos.forEach{
            t in if(t.id % 2 == 0 && t.isCompleted) {
               evens.append(t)
           }
       }
        return evens
    }

}
- Notice the
filterCompletedEvensfunction, it is the one that filters the Todos based on the requirements.
 func filterCompletedEvens () -> [TodoModel] {
        var evens: [TodoModel]  = []
        todos.forEach{
            t in if(t.id % 2 == 0 && t.isCompleted) {
               evens.append(t)
           }
       }
        return evens
    }
- The rest of the code is in the
todos.zipfile attached to this assignment; feel free to download and run it if you are interested.
Task 3
Statement 3
- Develop an iOS application in Swift, which can calculate the Body Mass Index of a person and determine whether a person has normal weight, is overweight, or is underweight.
- Create the UI where the user can give his input - weight, height, gender.
- Then there should be a button on the screen that when tapped should display the UI where the app displays the result. - Your app should also display the appropriate message as per the calculated BMI.
- That is, if a person is underweight or overweight, it should display a message in red color that you are underweight or you are overweight as the case may be and if the BMI is normal, it should display a message in green color that your weight is normal.
- Write the business logic using Swift OOP concepts.
- Hints:
- Design a screen where you can get inputs from the user.
- A button should be there on the same screen.
- Create a class with properties such as age, gender, and weight with apt data types as required and a method to calculate the BMI.
- Tapping on the calculate button on the input screen should trigger the code to create the object of the above class. - Using this object, call the method having the job of calculating BMI.
- Use swift enum and write the cases for, normal, underweight, and overweight conditions.
- You can verify the BMI ranges. – normal, overweight, and underweight on internet.
- Use the swift enum and switch-case to decide how you will be presenting the result on the screen to the user with the appropriate message and correct BMI.
Solution 3
- Also the requirements are vague, but I’m going to follow my own interpretation of the requirements.
- The application lands on a screen that includes a form to Enter your details (height, weight, age) and a button to calculate the BMI.
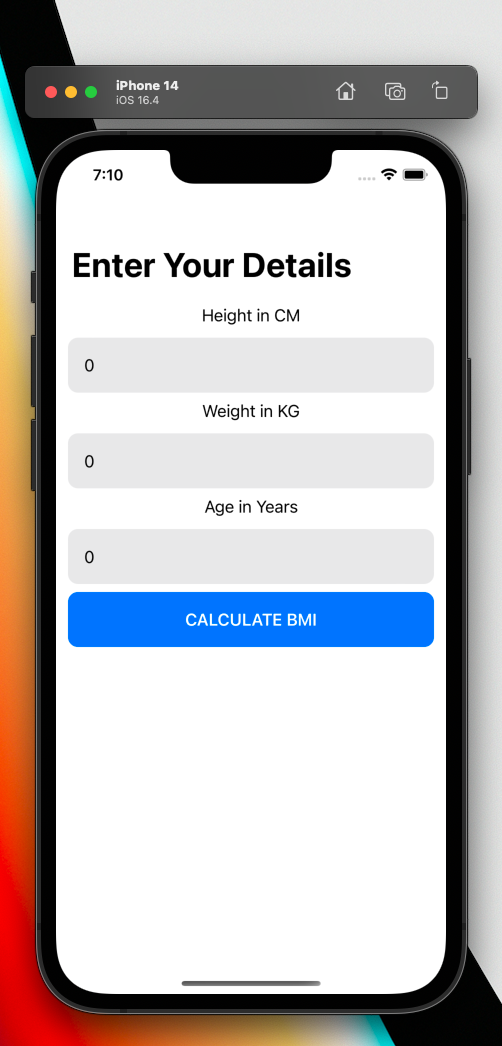
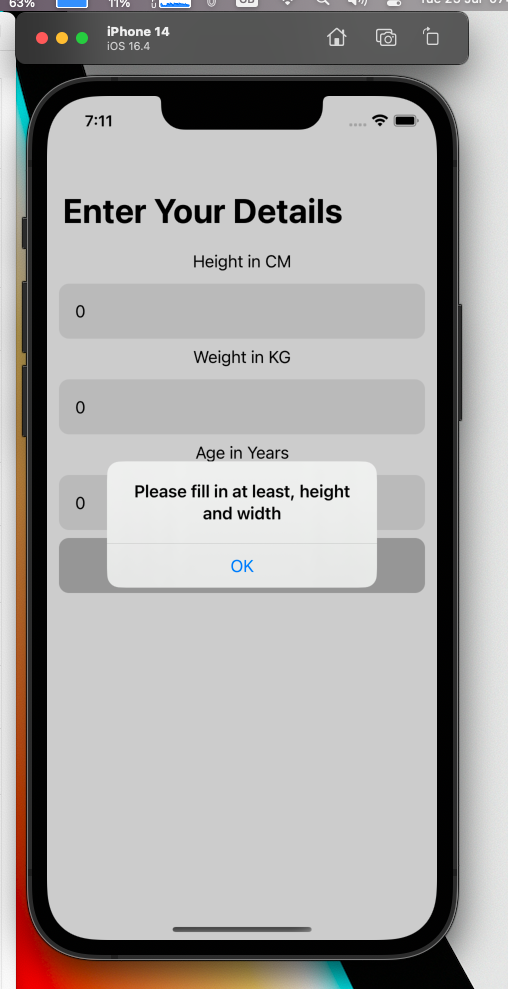
- Not entering any of the details will show an alert.
- Entering the details and clicking on the
Calculate BMIbutton will take you to the result screen.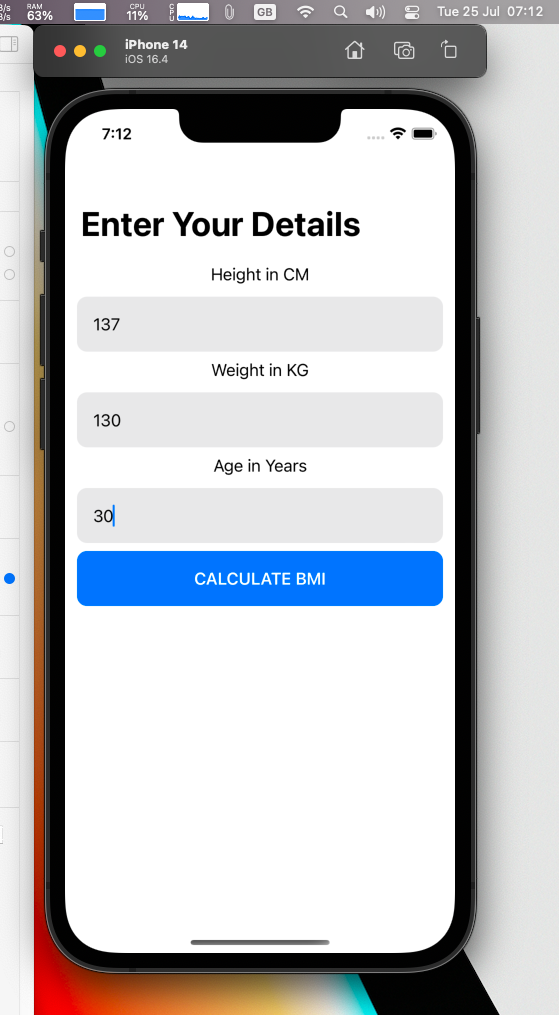
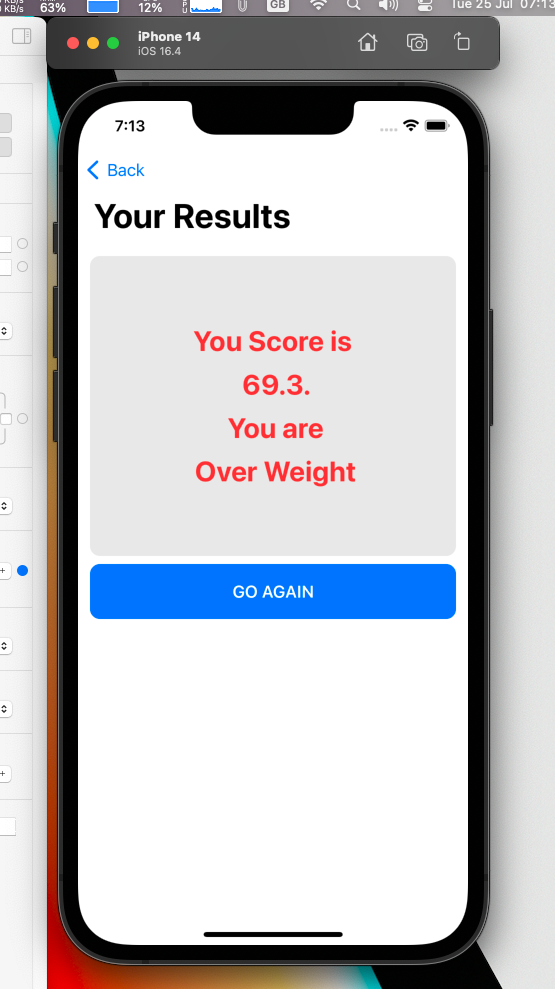
- Clicking the
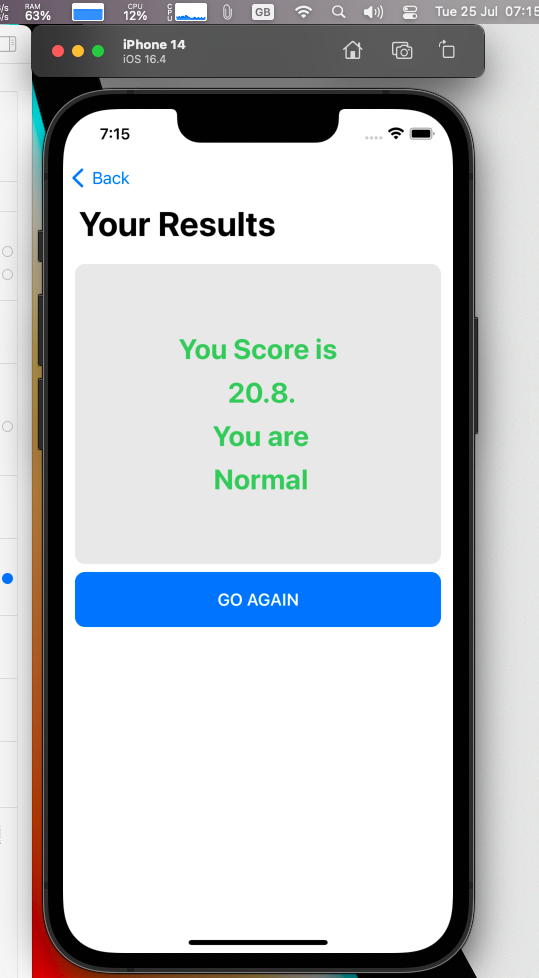
Go Againbutton will take you back to the form screen. - Example of normal results:
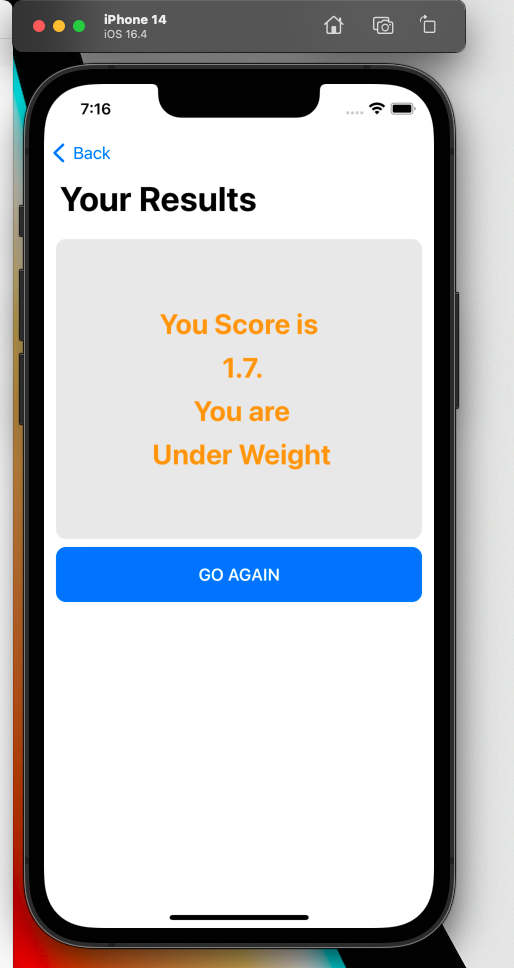
- Example of underweight results:
- Here is the
BmiCalculatorModel
// Models/BmiCalculator.swift
import Foundation

enum ResultStatus {
    case unknown
    case underweight
    case normal
    case overWeight
}

enum Gender: String, CaseIterable, Identifiable {
    case male = "Male"
    case female = "Female"
    case unknown = "Unknown"

    var id: String { self.rawValue }
}

struct BmiCalculatorModel {
    var age: Int = 0
    var gender: Gender = Gender.unknown
    var weight: Float = 0.0
    var height: Float = 0.0

    var bmi: Float {
        if(!isGood()){
            return 0.0
        }
        return calculateBmi()
    }

    var result: ResultStatus {
        if !isGood() {
            return ResultStatus.unknown
        }
        let score = calculateBmi()
        return mapScroeToStatus(score: score)
    }

    init (
        height: Float,
        gender: Gender,
        weight: Float,
        age: Int
    ){
        self.age = age
        self.gender = gender
        self.height = height
        self.weight = weight
    }

    func calculateBmi() -> Float {
        guard height > 0, weight > 0 else {
            return 0.0
           }

           return weight / pow(height/100, 2)
    }

    func mapScroeToStatus (score: Float) -> ResultStatus {
        if(!isGood()) {
            return ResultStatus.unknown
        } else if score <= 18.5 {
            return ResultStatus.underweight
        } else if (score > 18.5 && score <= 25){
            return ResultStatus.normal
        } else if score > 25  {
            return ResultStatus.overWeight
        } else {
            return ResultStatus.unknown
        }
    }

    func isGood() -> Bool {
        return weight != 0.0 && height != 0.0
    }


}
- And the form screen:
//  Views/FormView.swift
import SwiftUI

struct FormView: View {
    @Environment(\.presentationMode) var presentationMode
    @EnvironmentObject var bmi: BmiCalculatorViewModel
    @State var inputHeight: Float = 0.0
    @State var inputWeight: Float = 0.0
    @State var inputGender: Gender = Gender.unknown
    @State var inputAge: Int = 0

    @State var error: String = ""
    @State var showError: Bool = false
    @State var navigateToResult: Bool = false

    func isGood () -> Bool {
        return inputHeight != 0.0 && inputWeight != 0.0
    }


    func saveHandler(){
        if !isGood() {
            showError = true;
            error = "Please fill in at least, height and width"
        } else {
            let newBmi = BmiCalculatorModel(
                height: inputHeight,
                gender: inputGender,
                weight: inputWeight,
                age: inputAge
            )
            bmi.update(newCalculator: newBmi)
            navigateToResult = true
        }
    }

    let genderOptions = [
        Gender.male,
        Gender.female
    ];

    var body: some View {
        ScrollView{
            VStack {
                Text("Height in CM")
                TextField(
                        "Height in CM",
                        value: $inputHeight, format: .number
                     )
                    .padding(.horizontal)
                    .frame(height: 55)
                    .background(Color.gray.opacity(0.2))
                    .cornerRadius(10)

                Text("Weight in KG")
                TextField(
                        "Weight in KG",
                        value: $inputWeight,
                        format: .number
                    )
                    .padding(.horizontal)
                    .frame(height: 55)
                    .background(Color.gray.opacity(0.2))
                    .cornerRadius(10)


                Text("Age in Years")
                TextField(
                        "Age in Years",
                        value: $inputAge,
                        format: .number
                    )
                    .padding(.horizontal)
                    .frame(height: 55)
                    .background(Color.gray.opacity(0.2))
                    .cornerRadius(10)


                Spacer()
                Button(
                    action: saveHandler,
                    label: {
                        Text("Calculate BMI".uppercased())

                    }
                )
                    .foregroundColor(.white)
                    .font(.headline)
                    .frame(height: 55)
                    .frame(maxWidth: .infinity)
                    .background(Color.accentColor)
                    .cornerRadius(10)


                NavigationLink(
                    destination: ResultView().environmentObject(bmi),
                    isActive: $navigateToResult,
                    label: { EmptyView() }
                )

            }.padding(12)
        }
            .navigationTitle("Enter Your Details")
            .alert(
                    isPresented: $showError,
                     content: {
                        Alert(title: Text(error))
                    }
                )
    }


    func genderString(_ gender: Gender) -> String {
            switch gender {
            case Gender.male:
                return "Male"
            case Gender.female:
                return "Female"
            case Gender.unknown:
                return "Unknown"
            }
    }
}

struct FormView_Previews: PreviewProvider {
    static var previews: some View {
        @StateObject  var calculator: BmiCalculatorViewModel =
            BmiCalculatorViewModel()
        NavigationView{
            FormView()
        }.environmentObject(calculator)
    }
}
- And the result screen:
//  Views/ResultView.swift
import SwiftUI

struct ResultView: View {
    @Environment(\.presentationMode) var presentationMode
    @EnvironmentObject var bmi: BmiCalculatorViewModel

    var color: Color {
        switch(bmi.calculator.result){
        case ResultStatus.unknown: return Color.black
        case ResultStatus.normal: return Color.green
        case ResultStatus.underweight: return Color.orange
        case ResultStatus.overWeight: return Color.red
        }
    }

    var resultString: String {
        switch(bmi.calculator.result){
        case ResultStatus.unknown: return "Unknown"
        case ResultStatus.normal: return "Normal"
        case ResultStatus.underweight: return "Under Weight"
        case ResultStatus.overWeight: return "Over Weight"
        }
    }

    var formattedScore: String {
        return String(format: "%.1f", bmi.calculator.bmi)
    }


    func saveHandler(){
        presentationMode.wrappedValue.dismiss()
    }

    var body: some View {
        ScrollView{
            VStack {

                Text(
                    "You Score is \n \(formattedScore)." +
                    "\n You are \n \(resultString)"
                    )
                    .padding(.horizontal)
                    .font(.title)
                    .fontWeight(.bold)
                    .multilineTextAlignment(.center)
                    .frame(maxWidth: .infinity)
                    .frame(height: 300)
                    .background(Color.gray.opacity(0.2))
                    .foregroundColor(color)
                    .cornerRadius(10)
                    .lineSpacing(10)
                    .fixedSize(horizontal: false, vertical: true)

                Button(
                    action: saveHandler,
                    label: {
                        Text("Go Again".uppercased())

                    }
                )
                    .foregroundColor(.white)
                    .font(.headline)
                    .frame(height: 55)
                    .frame(maxWidth: .infinity)
                    .background(Color.accentColor)
                    .cornerRadius(10)

            }.padding(12)
        }
            .navigationTitle("Your Results")
    }
}

struct ResultView_Previews: PreviewProvider {
    static var previews: some View {
        @StateObject  var calculator: BmiCalculatorViewModel =
            BmiCalculatorViewModel()
        NavigationView{
            ResultView()
        }.environmentObject(calculator)
    }
}
- Rest of the code is in the
bmi.zipfile attached to this assignment; feel free to download and run it if you are interested.
References
- Swiftful Thinking. (2021). SwiftUI Todo List (Beginner Level). YouTube. https://www.youtube.com/playlist?list=PLwvDm4VfkdpheGqemblOIA7v3oq0MS30i